DIY Walkers
  • Home
  • Walker ABC's
  • Build Instructions
    • TrotBot Builds >
      • TrotBot Linkage Plans
      • TrotBot's Legs Simplified
      • Quadruped TrotBot
      • Hexapod TrotBot
      • TrotBot
      • TrotBot, Ver 3
      • Mindstorms TrotBot, Ver 3
      • Wooden TrotBots by Automata Korea Design
      • 3D Printed TrotBot by Scott Anderson
      • Mindstorms TrotBot, Ver 2
      • Mindstorms TrotBot
      • Large-Scale TrotBot
    • Strider Builds >
      • Strider Linkage Plans
      • Strider Ver 3's Legs
      • Strider Ver 3's Frame
      • Mindstorms Strider Ver 3 Mod
      • Strider
      • Strider's Legs Simplified (ver 2's)
      • RC Strider
    • Mechanical Spider >
      • Klann Mechanical Spider - Climbing Mod
      • Klann's Spider, EV3 Long Legs
      • Klann High-Step Mod
      • Klann's Spider, Ver 2
      • Mindstorms Klann
      • Klann's Spider, Ver 1
      • Klann's Linkage Plans
    • Strandbeest
    • LEGO Spot Micro
    • Linkage Warm Ups >
      • Lever Paradox
      • LEGO Biters
      • LEGO Punchers (4 bar linkage warm-up)
      • LEGO Hopping Robot
    • Hiro Labo
    • Whegs (wheel-legs)
  • Customize
    • Strider Linkage Optimizer
    • Klann Linkage Optimizer
    • Strandbeest Optimizer for LEGO
    • TrotBot Optimizer
    • 4 Bar Linkage Optimizer
    • 4 Bar Walking Linkage
    • 6 Bar Walking Linkage
  • Linkage Simulation
    • Python Linkage Simulator
    • Scratch Linkage Simulator
  • Blog

Adding Extensions to Linkages, by Oracid

6/5/2021

0 Comments


Posted by Oracid
(Editors note: you can see more of Oracid's inspiring creations here)

My goal is to explain simply how one can go from a usual 5 bars linkage to a 5 bars linkage with extension. The interest of this last mechanism is that it approaches the biological reality of a quadruped or a biped.

In Fig.1, I show the equivalence between a usual 5 bars and its diamond-shaped reduction.
The difference between these two linkages is located at the g bar which is fixed to the chassis. In the second linkage, the 5 bars turn into diamond with g = 0. Only the axis of rotation remains which fixes the 5 bars to the chassis.
Picture
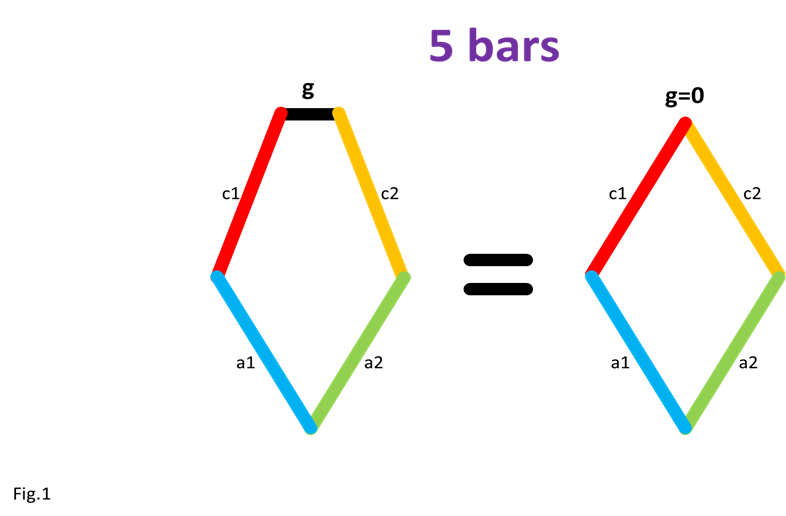
Editor's note: the cranks add additional bars to the 5 bars shown here

​Please note that both variations of this linkage have two degrees of freedom (DOF). In other words, two of the bars need to be controlled by two independent motors in order for this linkage to function. In contrast, 4-bar linkages have only one DOF and only require one motor for the linkage to function, like Chebyshev's Lambda linkage to the right, reducing the linkage's complexity, but also its versatility.
Picture

​​In Fig.2, I show that the shape of the bar c1 does not matter, provided that its ends keep the same position.
For clarity, only the left side of the 5 bars is shown.
Picture

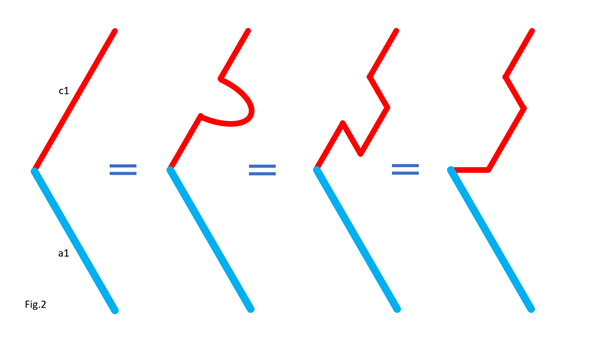
In Fig.3, I show that we can move part of the line c1, provided that the parts are connected by an articulated bar forming part of a parallelogram.
For clarity, only the left side of the 5 bars is shown.
Here is how to go from the assembly in Fig.3-1 to the assembly in Fig.3-2 by translating part of the line c1 and the line a1. Notice that point P remains at the same position.
Picture

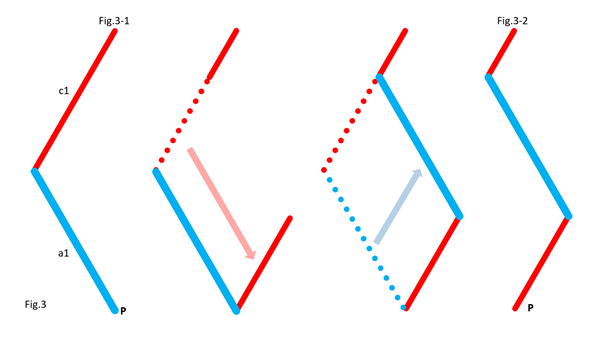
​​In Fig.4, I show that whatever the angle of c1 with the horizontal in Fig.4-1 and Fig.4-3, there is respectively equivalence of the position of point P in Fig.4-2 and Fig.4-4.
It is as if the two parts of c1 are one. This is because a1 and c2 (not shown, here) form a parallelogram which keeps the two parts of c1 at the same angle.
For clarity, only the left side of the 5 bars is shown.
Picture

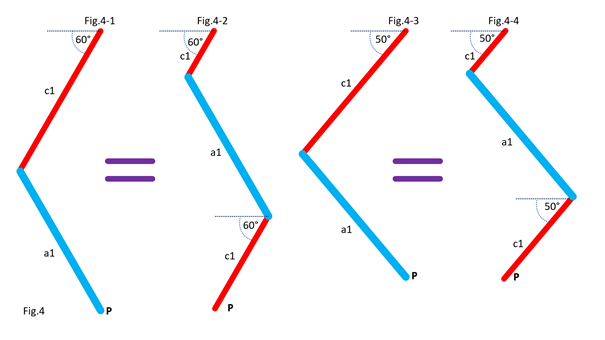
In Fig.5, we can see a summary of the translations of the bars c1 and a1.
The bar a1 is positioned at the end of the remaining part of the bar c1, while the “ghost” of the second part of c1 is translated and merged with a2.
Picture

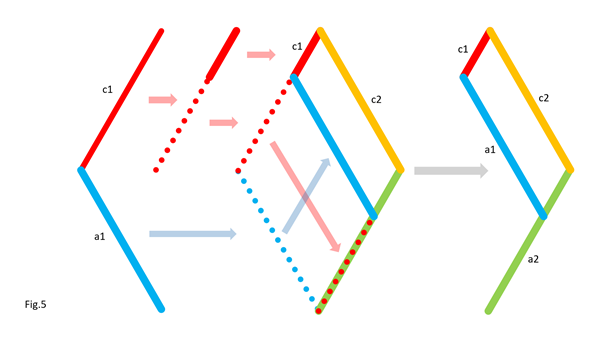
Fig.6 shows the result of the transformation and the equivalence of the two mechanisms.
Picture

Also, check out Oracid's single DOF linkages, like this:
0 Comments


Leave a Reply.

    Categories

    All
    Challenge Questions
    Experiments
    Feet
    Klann
    Strandbeest
    Strider
    Structure
    TrotBot

    Archives

    February 2023
    June 2021
    October 2018
    August 2018
    July 2018
    May 2018
    January 2018
    December 2017
    November 2017
    September 2017
    August 2017
    July 2017
    June 2017
    May 2017
    April 2017
    March 2017
    February 2017
    January 2017
    December 2016
    October 2016

    RSS Feed

  • Home
  • Walker ABC's
  • Build Instructions
    • TrotBot Builds >
      • TrotBot Linkage Plans
      • TrotBot's Legs Simplified
      • Quadruped TrotBot
      • Hexapod TrotBot
      • TrotBot
      • TrotBot, Ver 3
      • Mindstorms TrotBot, Ver 3
      • Wooden TrotBots by Automata Korea Design
      • 3D Printed TrotBot by Scott Anderson
      • Mindstorms TrotBot, Ver 2
      • Mindstorms TrotBot
      • Large-Scale TrotBot
    • Strider Builds >
      • Strider Linkage Plans
      • Strider Ver 3's Legs
      • Strider Ver 3's Frame
      • Mindstorms Strider Ver 3 Mod
      • Strider
      • Strider's Legs Simplified (ver 2's)
      • RC Strider
    • Mechanical Spider >
      • Klann Mechanical Spider - Climbing Mod
      • Klann's Spider, EV3 Long Legs
      • Klann High-Step Mod
      • Klann's Spider, Ver 2
      • Mindstorms Klann
      • Klann's Spider, Ver 1
      • Klann's Linkage Plans
    • Strandbeest
    • LEGO Spot Micro
    • Linkage Warm Ups >
      • Lever Paradox
      • LEGO Biters
      • LEGO Punchers (4 bar linkage warm-up)
      • LEGO Hopping Robot
    • Hiro Labo
    • Whegs (wheel-legs)
  • Customize
    • Strider Linkage Optimizer
    • Klann Linkage Optimizer
    • Strandbeest Optimizer for LEGO
    • TrotBot Optimizer
    • 4 Bar Linkage Optimizer
    • 4 Bar Walking Linkage
    • 6 Bar Walking Linkage
  • Linkage Simulation
    • Python Linkage Simulator
    • Scratch Linkage Simulator
  • Blog